Soft sourdough sandwich bread is the perfect loaf to have as a weekly staple. This recipe makes three loaves, so you’re able to have fresh homemade sourdough bread all the time.

Like many people, I began my sourdough journey during 2020 and have never looked back. This sandwich bread was actually the gateway drug to sourdough for me. After perfecting this recipe for our family, I’ve actually never bought store-bought sandwich bread again! It has become almost second nature to throw a few loaves together and I love that this bakes such a large batch. I typically only have to make these once a month, the loaves freeze so well. So if you’re looking for a great way to replace store-bought bread, try this soft crust sourdough bread recipe. You may be like me and never go back to traditional loaves from the store!
This homemade bread is the perfect staple to always have on hand and can be used in so many more ways than just sandwiches, though it is such a soft bread perfect for a peanut butter and jelly. I love to use this for french toast, croutons, breadcrumbs, bread pudding.. so many great uses from a few simple ingredients.
Ingredients
I love that this sourdough sandwich bread comes together with simple healthy ingredients and is refined sugar free!
- Active Sourdough Starter: You’ll want this to be active and bubbly. This recipe uses quite a bit of starter. I typically start with 100 grams of starter and add 200 grams water and 200 grams flour. Once it doubles and is bubbly, the bulk fed starter is ready.
- Warm water: Shoot for baby-bottle warm.
- Honey: Enriches the dough without refined sugars.
- Egg: Beat with a fork before adding to the dough.
- Salt
- Butter: I prefer salted butter, if using unsalted – add 1/2 tsp of extra salt.
- Flour: All purpose flour is perfect.

Recipe Tips
Which Mixer to Use
This recipe does produce such a big batch of bread dough, three loaves to be specific. Which is amazing because I only make this 1-2 times per month and then our family has as much sandwich bread as we need… To handle such a large quantity of dough I specifically purchased a Nurtrimill Artiste mixer for this bread, which works great! Before having the larger mixer, I have made a few batches in my Kitchenaid stand mixer, it held up ok but I just prefer the larger capacity mixer. If you don’t own either stand mixer, this recipe is adaptable for manual mixing. Just grab a large bowl, brace yourself for a bit of an arm workout, and you’ll be on your way to delicious homemade bread.
Bakers Schedule
Sourdough bread does take significantly longer to rise in comparison to traditional yeasted dough. I’ve added a baker’s schedule below which gives an idea of different timelines when making this bread. Sometimes I speed up the process to have bread the same day, otherwise I do prefer the overnight method which allows the dough to bulk rise and further breaks down the gluten content.
Same Day Bake
Morning (6 am): Feed your starter.
Noon (12pm): My starter is usually active and bubbly by this time, so I begin preparing my dough.
After it’s mixed, I’ll set it in a warm spot for the first rise. Which is usually my oven with the light on.
Afternoon (4:30): Once the dough has doubled, I’ll roll it out and shape into the loaves.
Next, cover with a tea towel and allow to rise for the second time. This usually takes 1-1.5 hours.
Evening (6-6:30 pm): Ready to bake. Once the loaves are done baking, I’ll let them cool and then bag and store.
Next Day Bake & Overnight Proof
Noon (12pm): Feed your starter.
Evening (6pm): My starter is usually active and bubbly by this time, so I begin preparing my dough.
After it’s mixed, I’ll cover the the bowl with plastic wrap and a towel. Then set in the fridge overnight.
The Next Morning (7am): Remove dough from refrigerator and set out at room temp for an 1-1.5 hours.
Morning (8:00am): Begin rolling out the dough and shaping the loaves.
Cover with a tea towel for the second rise.
Late Morning (9:30 am): Ready to bake. Once the bread is done baking, I’ll let them cool, then bag and store.
How to Make Sandwich Bread
Mix the dough: Weigh out your ingredients using a kitchen scale and add to the bowl of a stand mixer: active sourdough starter, water, oil, honey, salt, and egg. This can be whisked together by hand or mixed with your paddle attachment.

Add in Flour: Once mixed, switch to your dough hook and with the mixer on low speed begin adding in flour, one cup at a time. The dough should look rough and shaggy, if it’s still wet and sticky add more flour 1/2 cup at a time. Then drop in the softened butter in tablespoon size pieces.

Knead the Dough: Begin kneading the butter into the dough on medium to low speed with the dough hook attachment. Continue to knead for 5-7 minutes. The dough should feel soft and not stick to your hands. You can test the dough with the windowpane test.

Bulk rise: Transfer the dough to a large bowl and cover with plastic wrap or a lid for an overnight rise. During summer months, I always keep the dough in the refrigerator for this bulk rise. During cooler months, it works best for me to have the dough rise on the counter. The next morning, begin shaping the dough.


Shaping the dough: The next day, remove the dough from the proofing bowl, transfer to a lightly floured surface. Divide the dough into three equal pieces. Gently shape each piece into a log the size of your loaf pans, tucking the ends underneath. (If your bulk rise was in the refrigerator, I recommend setting the dough out for 1-2 hours before shaping to allow it to come to room temperature)

Second Rise: Transfer each loaf into a parchment lined bread pan smooth side up. Cover with plastic wrap or a damp towel for a second rise until slightly domed over the top of the loaf pan.


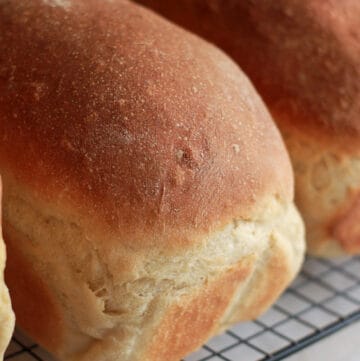
Baking the Loaves: Once the dough has risen, preheat your oven to 400 degrees. Bake the loaves for 28-32 minutes. The tops should be golden brown and the internal temperature should reach 180 degrees.
Cooling the Loaves: Remove from the oven and place on a cooling rack. Be sure to remove the parchment paper while cooling, this will trap steam and make the bottom of your loaf soggy.

Storing: Once each loaf is cool, store it in a plastic bag on the counter for 5-7 days or freeze for up to 6 months.

Favorite Variations
This bread is super versatile and sometimes I’ll add a few mix-ins while shaping the dough to change it up just a bit. When you are shaping your loaf, flatten the dough out into an 8×11 rectangle. Then sprinkle whatever mix-ins you like. Tightly roll the dough from the short side back into a loaf shape, gently tucking the ends beneath. Place into the parchment lined pan seam side down, and bake normally.
Our families favorite mix-ins are:
- Cinnamon Raisin: Generously sprinkle 1 Tbsp. of cinnamon over the dough and scatter 1/4 cup of raisins before shaping into the loaf.
- Craisins and Orange Zest: Spread 1/4 cup of Craisins and 1 tsp of fresh orange zest.
- Cheddar Cheese Cubes & Jalapeno slices: 1/2 cup cheese cubes and thinly sliced fresh jalapeños for a spicy kick.
Soft Crust Sourdough Sandwich Bread
Ingredients
- 400 grams active sourdough starter
- 2½ cups water warm
- ¾ cups honey
- 1 whole egg beaten
- 1 Tbsp salt
- ¼ butter softened
- 8-9 cups flour
Instructions
- Mix the Dough: Weigh out your ingredients using a kitchen scale and add to the bowl of a stand mixer: active sourdough starter, water, oil, honey, salt, and egg. These can be mixed together by hand with a whisk or the paddle attachment on your mixer.
- Add in Flour: Once mixed, switch to your dough hook and with the mixer on low speed begin adding in flour, one cup at a time. The dough should look rough and shaggy, if it's still wet and sticky add more flour 1/2 cup at a time. Then drop in the softened butter in tablespoon size pieces
- Knead the Dough: Begin kneading the butter into the dough on medium to low speed with the dough hook attachment. Continue to knead for 5-7 minutes. The dough should feel soft and not stick to your hands. You can test the dough with the windowpane test
- Bulk rise: Transfer the dough to a large bowl and cover with plastic wrap or a lid for an overnight rise. Or allow to rise in a warm spot until doubled in size.
- Shaping the dough: Once doubled in size, remove the dough from the proofing bowl, and transfer to a lightly floured surface. Divide the dough into three equal pieces. Gently shape each piece into a log the size of your loaf pans, tucking the ends underneath.
- Second Rise: Transfer each loaf into a parchment lined bread pan smooth side up. Cover with plastic wrap or a damp towel for a second rise until slightly domed over the top of the loaf pan.
- Baking the loaves: Once the dough has risen, preheat your oven to 400℉. Bake the loaves for 28-32 minutes. The tops should be golden brown and the internal temperature should reach 180℉.
- Cool the Loaves: Remove from the oven and place on a cooling rack. Be sure to remove the parchment paper while cooling, this will trap steam and make the bottom of your loaf soggy.
- Storing the Sandwich Bread: Once each loaf is cool, store it in a plastic bag on the counter for 5-7 days or freeze for up to 6 months.
If you loved this sandwich bread recipe, check these out!


Leave a Reply